Command Line Tuesdays - Part Seven
5. Aug 2014 | Nenad Latinović | No License
Heya geekos. I’ve checked the ‘curriculum’, and we’re at part 7 of 8 as of today. Which means there will be one more - and sadly final - CLT next tuesday. So for today, let’s deal with some permissions!
As we all know, we can have many users using one machine. To protect the users from each other, permissions have been devised. And we have already discussed file permissions, so let’s refresh our memories with a single click.
chmod
The** chmod** command is used for changing permissions on a directory or a file. To use it, you first type the chmod command, after that you type the permissions specification, and after that the file or directory you’d like to change the permissions of. It can be done in more way, but mr Shotts focuses on the octal _notation _method.
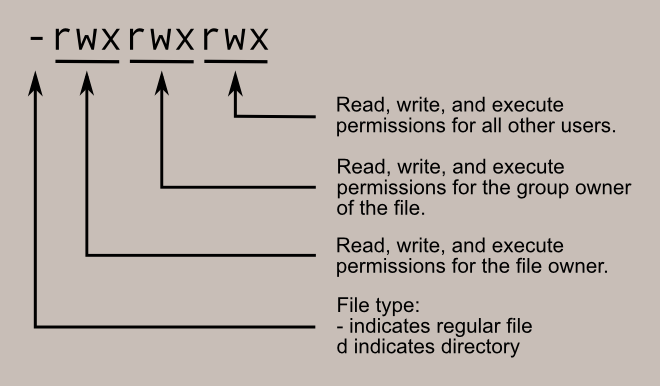
Imagine permissions as a series of bits. For every permission slot that’s not empty, there’s a 1, and for every empty one there’s a 0. For example:
rwx = 111 rw- = 110 etc.
And to see how it looks in binary:
rwx = 111 ---> in binary = 7 rw- = 110 ---> in binary = 6 r-x = 101 ---> in binary = 5 r-- = 100 ---> in binary = 4
Now, if we would like to have a file with read, write and executing permissions for the file owner and for the group owner of the file, but make it unavailable to all other users, we do:
chmod 770 example_file
…where example_file is any file you’d like to try this command on. So, you always have to enter three separate digits, for three separate groups known already from our second lesson. The same can be done for directories.
su and sudo
It is sometimes needed for a user to become a super user, so he can accomplish a task (usually something like installing software, for example). For temporary accessing to the super user mode, there’s a program called** su**, or substitute user. You just have to type in
su
and type your superuser password, and you’re in. However, a word of warning: don’t remember to log out and use it for a short period of time.
Also there’s an option probably more used in openSUSE and Ubuntu, and it’s called sudo. Sudo is only different in the aspect, that it’s a special command that’s allocated to one specific user. So unlike su, with sudo you can use your user password instead of the superuser’s password. Example:
sudo zypper in goodiegoodie
Changing file and group ownership
To change the owner of the file, you have to run** chown** as a superuser. For example, if I’d want to change ownership from ‘nenad’ to ‘suse’, I do it this way:
su [enter password] chown suse example_file
I can also accomplish the same with changing group ownership, but with a slightly different command chgrp. Easy peasy:
chgrp suse_group example_file
…and that’s it.
Next time
As I already stated, next time we’ll have a photo-finish of sorts. And after that, you’ll be on your own (along with me, wandering through the terminal’s darkness, with only a blinking green cursor as a lighthouse :) ). Until then geekos, remember to…
…have a lot of fun!
Categories: Distribution
Tags: